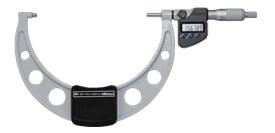
• This large Digimatic micrometer series is available in various sizes up to 500 mm. It features a ratchet stop for constant measuring force.
• Measuring faces: Carbide tipped
|
||||||||||||||||||||||||||||||||||||||||
![]()
• All models have a measurement data output function that is useful for measuring large workpieces. This function allows
you to easily send data via an optional communication cable or wireless system and import it to spreadsheet software or use it in various applications.
|
Inch/ Metric |
|
Code No. |
Range (in) |
Resolution |
Measuring force (N) |
Maximum permissible error JMPE (in) |
Flatness (in) |
Parallelism (in) |
|
With SPC data output |
||||||
|
293-782 |
12 - 13 |
0.0001 in /0.001 mm |
10 - 15 |
±0.0003 |
0.000024 |
0.0002 |
|
293-783 |
13 - 14 |
|||||
|
293-784 |
14 - 15 |
|||||
|
293-785 |
15 - 16 |
±0.00035 |
0.00024 |
|||
|
293-786 |
16 - 17 |
|||||
|
293-787 |
17 - 18 |
|||||
|
293-788 |
18 - 19 |
±0.0004 |
||||
|
293-789 |
19 - 20 |
0.00028 |
||||
Functions
Origin point setting (ABS measurement system): Resets the ABS origin at the current spindle position to the minimum value of the measuring range and switches to ABS mode.
Zero-setting (INC measurement system):
A brief press on the ZERO/ ABS button sets display to zero at the current spindle position and switches to the incremental (INC) measuring mode. A longer press resets to the ABS measuring mode.
Hold:
The function that holds the display of value is useful when it is difficult to see the measured value at the measurement point. When the function is cancelled, the previous zero-set point or a measured value with reference to the origin is displayed.
Function lock:
This function allows the PRESET (origin point setting) function and the ZERO (zero-setting) function to be locked to prevent these points being reset accidentally. Auto power ON/ OFF:
The reading on the LCD disappears after this instrument is idle for about 20 minutes, but the reading and measurement mode are retained. Turning the spindle causes the reading to reappear.
Data output:
Models equipped with this function have an output port for transferring measurement data to a Statistical Process Control (SPC) system.
Error alarm:
In case of an overflow on the LCD or a computing error, an error message appears on the LCD, and the measuring function stops. This prevents an instrument from giving an erroneous reading. Also, when the battery voltage drops to a certain level, the low-battery-voltage alarm indicator appears well before the micrometer becomes unusable.
Optional Accessories
|
Code No. |
Type |
Description |
|
264-020 |
— |
USB Input Tool Series USB Keyboard Signal Conversion Type IT-020U |
|
04AZB512 |
CR |
Connection cable (1 m) |
|
04AZB513 |
CR |
Connection cable (2 m) |
|
959149 |
C |
Connection cable (1 m) |
|
959150 |
C |
Connection cable (2 m) |
|
06AFM380C |
C |
USB Input Tool Direct (2 m) |
|
02AZD730G |
IP67 |
U-WAVE-T |
|
02AZD880G |
Buzzer |
U-WAVE-T |
|
02AZE200 |
— |
U-WAVE-T mounting bracket |
|
02AZD790C |
C |
Connection cable for U-WAVE-T (160 mm) |
|
02AZE140C |
C |
Connection cable for U-WAVE-T For foot switch |
相关资讯
联系我们
免费热线:18866860691 QQ:


